Call Us Today For A Free Consultation: 615-525-8464
Texturing drywall represents one of the final steps in the finishing process that can dramatically transform the appearance of your walls and ceilings. Many homeowners seeking remodeling services in Oak Hill, TN, are discovering that properly textured drywall adds character, depth, and visual interest to otherwise plain surfaces while helping to hide minor imperfections. Whether you’re attempting this project or planning to hire professionals, understanding the basics of drywall texturing will help you make informed decisions about the look you want to achieve in your space. From proper surface preparation and material selection to application techniques and pattern creation, this comprehensive guide walks beginners through the essential steps for successfully texturing drywall to create professional-looking results without specialized experience.
Before you start applying texture to your drywall, it is essential to properly prepare the surface to guarantee a smooth and professional finish. Begin by inspecting the drywall for imperfections such as dents, holes, or cracks. Use a joint compound to fill these flaws, ensuring a seamless surface. Once the compound is dry, sand the area gently to create a uniform texture. Next, remove any dust or debris from the surface using a damp cloth. To promote adhesion, it is advisable to prime the drywall before applying any texture. This step not only helps the texture adhere better but also enhances the overall appearance of the finished texture. Properly preparing your drywall surface sets the foundation for a successful texture application.
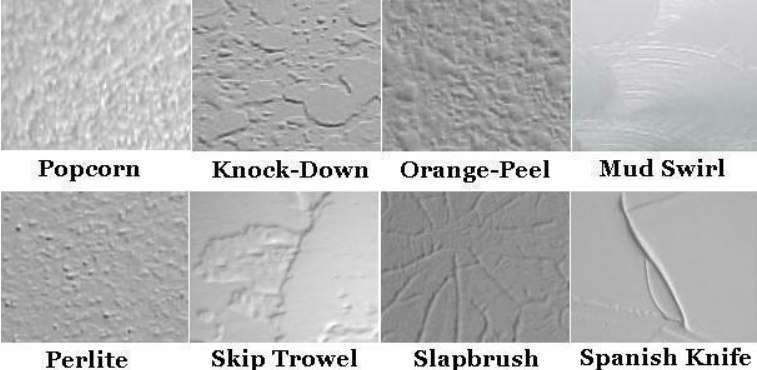
What factors should you ponder when choosing suitable texturing materials for your drywall project? When selecting the right texturing materials, it is essential to contemplate the desired texture finish, the tools available for application, and your experience level with texturing. For beginners, it is advised to start with pre-mixed texturing compounds that are easy to work with and require minimal preparation. These compounds come in various textures, such as orange peel, knockdown, or popcorn, allowing you to achieve different finishes. Moreover, make sure you have the necessary tools, such as a trowel, hopper gun, or texture roller, depending on the texture you aim to create. Choosing the appropriate texturing materials will significantly impact the outcome of your drywall project.
When applying the texturing compound to your drywall, ensure the surface is clean and properly prepared to achieve a smooth and professional finish. Mix the compound according to the manufacturer’s instructions, maintaining a uniform consistency and applying the compound to the drywall in even strokes using a trowel or a putty knife. Work in small sections to prevent the compound from drying out too quickly. Apply the compound evenly, filling in any gaps or imperfections. Once the entire surface is covered, allow it to dry completely before sanding any rough spots. This step guarantees a flawless base for creating your desired texture pattern.
To achieve a variety of texturing patterns on your drywall, experiment with different techniques and tools to enhance the visual appeal of your walls. One popular method is the skip trowel technique, where you apply joint compound in a random, skipping motion to create a subtle, textured finish. Knockdown texture involves applying joint compound with a trowel and then flattening it slightly to create a smoother texture with a few gentle peaks. If you prefer a more pronounced texture, consider the orange peel technique, where joint compound is sprayed on and then lightly flattened for a bumpy finish. Combining these techniques or trying different tools like brushes or sponges can help you achieve unique and striking texturing patterns on your drywall.
Complete the finishing touches by carefully smoothing out rough edges and cleaning up any excess joint compound or tools used during the texturing process. Use a drywall knife or sanding block to gently remove any bumps or imperfections left behind to ensure a polished look. Pay close attention to corners and edges, as these areas can easily accumulate excess compound. Once the surface is smooth and free of any debris, wipe it down with a slightly damp cloth to remove any remaining dust. Remember to clean your tools promptly to prevent the compound from hardening. By taking the time to properly finish and clean up after texturing, you will achieve a professional result that enhances the overall appearance of your drywall.
Other Related Tips:
Licensed, Bonded, Insured.